Thursday, May 31, 2012

Heading off to Farm Chicks


Photo courtesy of  the farmchicks

I'm headed off to The Farm chicks show in Washington with a couple of my BFF's.
For those that don't know its a HUGE antique show and draws
people from around the world and this year I'm going. WOOOHOOOO

I'll be on the lookout for lots of goodies for me and You.
I'll be bringing my camera for some photo shoots and posting a giveaway when I return. 
So hope you check back and see what I found.


Monday, May 28, 2012

Finally some PLAY TIME

Yes I finally found some play time and
 it sure felt good to be able to create again.
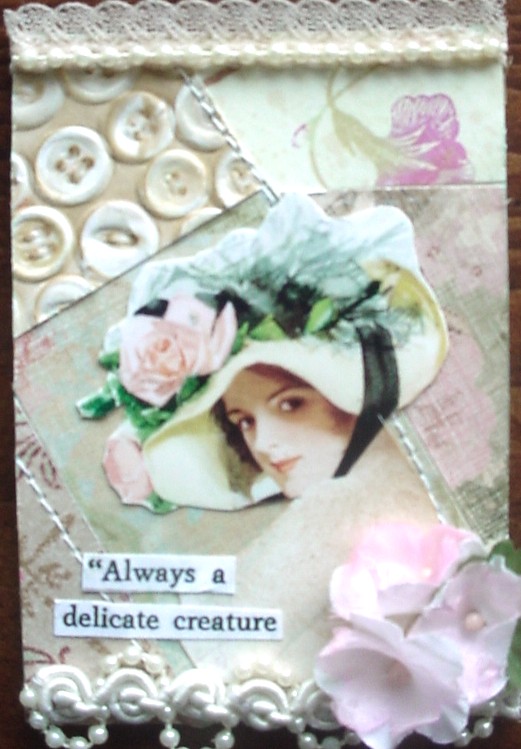
I made some Shabby Chis ATC's
for the Yahoo group I'm in.

Stitched together lots of pretty papers.
Of course whats shabby chic without lace?

and pearls and flowers.

Then I created this Sacred Bracelet for my Etsy shop.
Full of vintage crosses, medals, rhinestones and crystals.

Hope you all found some creative time this weekend.
On Friday I'm off to the Farm chix show in Washington with my
girlfriends. Can't wait to see what treasure we'll find!

Wednesday, May 23, 2012

Published- Catch up

Hey bloggers. Long time no post. No I didn't fall off the face of the earth
 although I felt like it. I have been very sick.
Thought I might end up back in the hospital but
luckily everything turned out o.k and I'm finally back to my old self.
Not much new in creating lately but I did receive a
complimentary copy of the
Catch up issue and they published a couple of my pieces.


Two of my very faves from the Paris Exposition plates at


A fun little hanging using those same images.

I'll be over to visit with you soon. Missed seeing what you all are up to.

Oh and the little disaster at our home is just about fixed. Yeah!!!!
Thanks to my DH working his little bum off.
Don't know how I'd manage without him.


Saturday, May 12, 2012

Faux Friday-Wakeboarding

Its been a long time since I posted a Faux Friday.
Its not that I haven't been working!
 I have. Its just most of the time I forget to bring my camera to a job.
Here's one I did recently that was a lot of fun.
It was for a boys room.
They wanted a mural of the boys wake boarding.
After I finished the first boy.... You guessed it they wanted the boat too!
Its hard to tell in the photo but its a very long wall and a very long boat!

On another wall I added the younger boy and his dad.
Needless to say the kids LOVE it!
Yes sometimes my job Rocks!!!

Wednesday, May 9, 2012

A Sneak Peek

I was thrilled when Helene from 2 AM Scrapper 
asked me to be a part of her first post at
Its all about Weddings and Lace.
Heres a little sneak peek of my project.


You'll have to pop over to see the rest.
Thanks for including me Helene!

We've had a bit of a disaster at our home recently so I'm running WAY behind.
Forgive me for not stopping by but I will come visit as soon as I can.

Sunday, May 6, 2012

Alice in Wonderland ATC


Anything Goes
 Thats the theme this month over at The Altered Alice
sponsored by Alpha Stamps for the month of May
I created some ATC's  for a swap I did.
This is one of them
The Mad Hatters Tea Party.
and right now Alpha Stamps has ALL their
Alice in Wonderland things on Sale.
Not only that!!! If you enter in the challenge you have a chance at winning a
"Alices Adventures" rubber stamp sheet and Everyone gets a
 White Rabbit collage sheet just for playing!

Tuesday, May 1, 2012

Do you Get Inspired?

I know I do!
I first saw some necklaces something like this in the last issue of
Belle Armoire Jewelry.
They were done by the artist Diana Frey
I again saw them on Pinterest and knew I just had to give it a try.

I decided to create one for my dear friend Mindi for her Birthday.
 I gave it to her already so now I can share it with you.
She loved it by the way!

Available in my Etsy Shop
This piece I created for Mothers day.
 Made from a vintage Mother of Pearl heart
and some fun charms.

Linking these to Brendas blog Bumble Bees and Butterflies
For her Tuesdays Treasures.

Thursday, April 26, 2012

Steampunk ATC's

I must be in a real Steampunk mood these days!
I did these for a Yahoo swap for Steampunk couples
Images from Artchix Studios, text from Alpha Stamps

Images from Altered Artifacts

Images from Artchix Studios and Alpha Stamps


Graphics 45 and Artchix Studios

I promise my next things won't be Steampunk!

Back soon with some B-day gifts I made for friends

Thursday, April 19, 2012

Altered Altoid Tin- Balloon Factory

I had s much fun creating this Steampunk Balloon Factory out of an Altiod tin.
Its for an upcoming swap I'm in.
Wasn't sure if I wanted to show it yet but I just couldn't wait!
The Balloon stamped images are from Oxford Impressions
The guy image from Art Chix Studios

Some random finds and time piece from Tim Holtz.
Entering this in the Anything goes challenge at
and the challenge to upcycle at

Thursday, April 12, 2012

Gingersnap Creations Color Challenge


I've been so busy this past week I haven't had any time to play.
I decided I had better post something before you all forget me!
Here's a Copper bracelet I made using mostly handmade charms.
My favorite is the faux tintype in the front.
Entering this in the color Challenge Copper,Ginger or Rust at
Now I'm off to visit some blogs. Really missed you all!

Friday, April 6, 2012

Tim's 12 Tags of 2012 Challenge

I'm early this month with
my version for Tim's 12 tags of 2012 challenge for April.
Improvised again for a lot of it. I used his on the edge die,
The Festive Greenery die and distress inks,
Check out Tim Holtz for details on how
 he did this months tag.

Wednesday, April 4, 2012

Easter Cards

Oh my ..Time is really getting away from me. With only a few days till Easter
I thought I had better get these cards posted.
Stamped images from Oxford Impressions
Easter Bunny

Now to just get them in the mail!!!!

Sunday, April 1, 2012

Easter Egg Swap


 I played along with the Easter Egg box swap hosted by JoAnne at Vintage Dragonfly
I received this beauty from JoAnne herself.
Isn't it gorgeous with all those shabby chic flowers and pearls.
Now why I didn't think of doing mine like hers ?
Where you can see the inside at a glance!
Thank you JoAnne I LOVE it!!!!
Do check out her blog her pictures are much better than mine.

Here's mine for Karla. The outside.
Now for some reason I envisioned a hole in the side to peek through.
But of course you can't see anything inside its dark. duhhhhh!!!!

So you have to open the box to let some light in when looking through the hole.
The inside has a little bunny garden with flowers,eggs, watering can,
butterflies and of course some Easter Bunnies.

Hoppy Easter Everyone!

Thursday, March 29, 2012

Mostly Marie's


Interested in seeing how I created all these spoon pendants?.
You can find the tutorial and all the components here at

Monday, March 26, 2012

Antique Buttons and Featured

When I was a young girl my Grandma gave me her prized
antique button collection.
Many are over 100 years old.
I mounted them into a lace backed frame and reside in my bedroom
sharing space with my beaded vintage purses.

My favorites are these tiny little hand panted ladies. I think they might be Marie?
They only measure about 3/8 of an inch and appear to be real gold.


Others are tiny mosic's, some enamel's, some look like black diamonds.
I'd love to know more about these if anyone has any informaton?
I've done searches,
 looked through antique button books and checked the internet.
No such luck!

More available in my etsy shop
Heres another use for vintage MOP buttons. As the centers of my butterfly.
In Sweet Easter Peat Pots.

A rusty tin for a spring bird  Easter nest.
With a fabric transfer stitched onto burlap.


I would like to give
knick of Time Interiors A shout out for Featuring me this week.
Thank you Angie. Its an honor to be included.
Stop on by and see all the Beautiful things at

Saturday, March 24, 2012

Tim's Monthly Tag Challenge

I'm a bit late to the party but I made it.

My tag from Mr. Tim's monthly challenge for March.

                           You can find out how I used his technique here at Tim Holtz
Mines a bit different as I don't have his butterfly die ,So I substituted his Flower die. I also don't have his wood stamp but I do have a wood embossing folder so I made a little fence with that for the background.

Now for my blog candy winner from my last post. Its # 25
Trisha Too. Congrats Trisha please send me your addy and I'll mail off your prize.
Thanks for playing all!!!

Random Integer Generator

Here are your random numbers:
25
Timestamp: 2012-03-24 16:28:56 UTC

Tuesday, March 20, 2012

Tutorial- How to Etch Metal

With so many requests I figured it was about time I shared with you how
 I etch my metal with rubber stamps.
Grab a cup of tea or coffee sit back and enjoy!


Etching Tools and Materials
 Metal: brass or copper sheeting, Ferric Chloride, Liver of Sulfur, Tin snips,
Plastic containers to hold metal pieces, Blue painter’s tape, Sharpie Marker-Black, Stazon Ink pad- black, Rubber stamps (heaver images work best), Metal file, Steel wool, Rubber gloves, baking soda,
Old toothbrushes, Drill or metal punch, Band Saw or Jewelers saw, Eye Protection or goggles,
Paper towels, Clear sealer
Liver of Sulfur  (if you want to antique your finished piece) 

Technique
1. Begin by cutting pieces of brass sized to fit stamps. Cut using tin snips.

2. Stamp the image on the metal pieces with black Stazon ink and your rubber stamps.
3. You will need to edge the pieces of your metal with black Sharpie
    (this will prevent the solution from eating away at the sides)

4. Take the brass pieces and add strips of Blue painters tape on the back burnishing down to secure.
5. Make sure your work area is protected as Ferric Chloride stains. Wear rubber gloves and place the prepared metal pieces in a plastic container image face down using the tape to secure the sides.
 Add Ferric chloride so the metal floats on top of the liquid.
Let sit for approx. 3 to 4 hours.
6. Wear gloves before removing the metal pieces and clean with baking soda using an old toothbrush.
Follow by cleaning with water to remove residue.


7. You can cut the shape of the your pieces by using a band saw and a thin blade.
 Remember to wear eye protection.  A jewelers saw will also work but will take a lot longer.
If you don't have access to a saw you can simple cut your pieces square.

8. Use a metal file to smooth edges of cut pieces.


9. Use a metal punch or drill holes at this time if you'd like

You can Antique your pieces as desired by dipping them in the bath of Liver of Sulfur. Follow manufactures instructions. Brass takes on the color very quickly. Let dry sand lightly with steel wool to desired finish.
Spray finished pieces with a clear sealer to protect clothes

Tips: Wear rubber gloves and protect clothing when using Ferric Chloride as it stains.
Always wear eye protection when cutting or filing metal.
If when stamping your image on metal it smudges you can clean with Stazon cleaner or Ultra Clean, remove residue before re-stamping.
Use stamps that have thick designs for best results.
You can re-use the ferric Chloride, but it does lose some of its strength. Be sure to cover tightly.
To dispose of mixture weaken with baking soda first. Follow manufactures instructions.
Resources.
Ferric Chloride can be purchased at most Electronic Supply stores.
Brass or copper sheeting .32 gauge. I purchase mine at a metal supply store.

I hope you have enjoyed my tutorial.
Please let me know you stopped by and leave a comment.
I'll be giving away a little blog candy to one of you on Saturday.
Giveaway Now Closed

I'd love to see your results so be sure to share your finished pieces.


Friday, March 16, 2012

Something a little different

What do you get when you add miniature perfume bottles,

some re-purposed jewelry pieces,

pearls & crystals

some solder

vintage rhinestone's

chains and hinges

Vintage Rosary beads

Available in my Etsy shop

and a little imagination?
Some fun necklaces to hold those special keepsake and treasures.


Stop back Tuesday for my free tutorial
on how to etch metal with rubber stamps

Linking up to Knick of Time

Blog Archive