Wednesday, August 15, 2012

Tutorial For the Best Molds & Castings Ever


I have tried just about every  type of mold making and casting material over the years
 and this is by FAR the very BEST you'll ever find.The detail is incredible.

Just look at the detail I was able to achieve using these techniques.
The cross on the right is the original on the left is the casting.
same with the vintage metal hinge. The owls on the top are the original.

Making your Molds
Here's what you'll need:
A non stick craft sheet
A old paintbrush - believe me you want a cheap one as it will no
longer be good for anything when your through.
Mold Builder By Castin Craft. (I purchased mine at Hobby Lobby with a 50% off coupon.)
 So it was only around $8.00 and this stuff goes a long long way!!
A old cloth or paper towels for cleaning off that brush after each coat.
Some charms, old jewelry or anything you want to cast. metal, wood, glass.
just about anything will work.
If you have a precious keepsake you just can't bare to use
here's the perfect way to re-create them to use over and over.
castin craft sells a special sealer if your worried about damaging any precious items.
I have never used it though and haven't had any trouble with it.

Brush on a thin coat of Mold Builder,
being careful not to get any on the backside.
If you do wipe it off with a paper towel right away.

Set on the craft sheet and let dry

You'll want to do several pieces at one time.

remember to wipe off that brush each time!!!!

You can use a heat tool or hair dryer to speed up the drying process for the first few layers.
 Do not overheat or you'll get bubbles.

For your second coat lay pieces on your craft sheet and paint another coat of the mold builder
making sure you paint an area around the piece about 1/2" .
Don't move piece from now on!! 

Do all your pieces the same way and let dry.
You will need to repeat this process of coating your piece 8 to 10 times.
I know this sounds like a lot but its needed to support your casting.
Let each layer dry between coats.
It will take a couple of days to build up all these coats if left to dry naturally..

When your pieces have been coated and dry.
Peel them away from your original.
They will look like this. A kind of yellowish color.
They are very strong but flexible at the same time.


Making Your Castings
Now your ready to make your castings.
You will need a craft sheet. cheap baby lotion ,
The molds you created and Apoxie Sculpt.


This is a two part Epoxy Resin. A Resin and Hardner. Its super strong
 It can be painted, sanded, drilled, cut, stained ,molded, carved
and its pretty much indestructible.
 I've used it for years when I would make feet for my carved birds of prey.
You can find it online at Epoxy Sculpt or possibly at your local craft store.

You will need to use some baby lotion on your hands.
 This will prevent the Apoxie Sculpt from sticking to your hands and your mold.
Rub a little lotion inside your mold coating it lightly.
It will work as a release but will not weaken or damage the Apoxie Sculpt

Now take one part of equal amounts of the Apoxie Sculpt.
 Guesstimate what you will need to fill your pieces.
Remember this stuff goes a long way! Mix with your fingers until thoroughly mixed
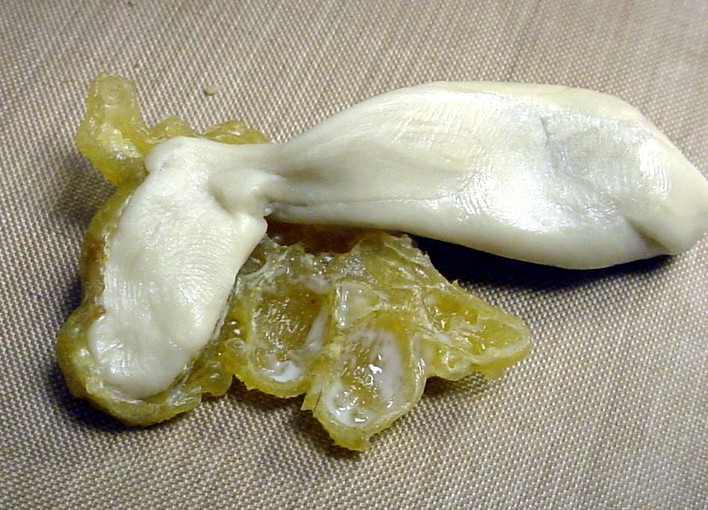
begin to fill you mold with your resin pushing into mold with fingers.
You'll want to make sure you reach every nook and cranny.

Smooth over the back with a little lotion.
Now let it set for a few hours.
It will depend on how big your project is to determine how long it will take to dry.
I usually poke the back with my fingernail. If it dosen't go in its set.
Now peel the mold away from your resin
and your ready to sand edges if needed, paint, stain or finish as desired.
Your new molds can be used over and over again


I hope you found my tutorial helpful.
If so please let me know you stopped by.
If you have any questions feel free to ask

Call your friends and have a mold making party. Its a blast!!
Have Fun!!!!!


Sunday, August 12, 2012

Gypsy ATC's

Yes I caught the Gypsy bug! With all the cool images
out there how could I not get in on the Gypsy ATC swap at VPI.
Hard to tell but this guy is 3-D

and who wouldn't let this beauty read your Fortune?

How about a spin on the Wheel of Fortune,
What does your future hold?

These are just a few I created for the swap.
Got to have something as a surprise!

I've been working like a mad women on Halloween treats.
But I just can't bring myself to say goodbye to summer yet.
Our winters here are much to long so your going to
have to wait a few more weeks to see my creations.

Enjoy all those lazy hazy dog days of summer!

Saturday, August 11, 2012

I Have A New Badge


I have a New Blog Badge!!!
Thanks to the very talented and gracious Laura Carson at Artfully Musing
Laura custom designed this badge just for me!
and I couldn't be happier. Isn't it beautiful!!!
Please feel free to share my badge on your sidebar if your so inclined.

Now I'm off to do some catching up with all my blog friends!


Monday, August 6, 2012

A Little Chunky ATC

If you have never tried making a Chunky ATC I highly recommend it.
 They are so much fun!
This one was created for a swap and she has already received it
so now I can share it with you all now.
The little frozen Charlotte is one I made from a cast I created
I'll be doing a tutorial for you very soon.
So keep watching!

You can get an entire box of wood blanks by simply cutting up a 2x4 .
The actual measurements are 3 1/2" so it works out perfectly.
You can even have the lumber yard cut them for you.
 Many times for free. Just have them cut them at  2 1/2"
Then your ready to paint,stain,collage and decorate till your hearts content.


Friday, August 3, 2012

Playing Catch Up

If your like me it seems like summertime just flies by.
So much to do before the snow flies once more.
I've gotten so far behind these past few weeks. So now's my time to show you all the Wonderful things I've been receiving in all those swaps I played in.


I was lucky enough to have Kimberly as my swap partner. She sent me this WAY KEWL Altered Altoids tin. This was her First Steampunk piece. Can you believe it!!! I just adore everything she creates but this takes the cake!!! Love the ride! See more pics on her blog at Art Joy Stuff


Then I played in a swap for Blissful art. We were to make charms from vintage things. Here's the ones I received back. Pretty great charms aren't they!!! Top L to R- Peace Schuyler, Becky Swartzlander,Marsha Mees,Wendy Aspinall,
BottomL to R -Kimberly Laws, and mine.


A few Atc Swaps. This one was for Beware Pirates at VPI.
The talent in this group just blows me away.
Top L to R.-Kris Dickinson,Liz DeWitt,Wendy Aspinall.
Bottom L to R.- Laura Carson, Connie Koutsourelis, April Dudko.
 Love them all !!!


Way back when I shared the ATC's I made for the
VPI group for the Corsets/ Dress Forms swap.
 Here's the darlings I received back from these talented gals.
Top L to R- Kris Dickinson, Michelle Carrier,Terri Daugherty.
Bottom L to R.-Sandy Scholz,Martina Fuchs,Candy Colwell.


and From The Altered Domino book .
Wendy created this wonderful Steampunk Domino book.
You can see more of Wendy's art here at Bliss Angels


These weren't for a swap but a couple pieces I made for some dear Blog friends for their Birthday.
They weren't quite finished in this photo. I went back and added a little text.
Hope it made their day just a bit more special.

If you get a chance check out these amazing artists blogs. Well worth the visit!
Hope your all enjoying your summer.

Wednesday, August 1, 2012

Somerset Gallery Published

What a lovely surprise to find the Somerset Gallery in my mailbox!
and perfect timing with Halloween just around the corner!

They published my "A Haunting we Will Go" altered book.
rubber stamp images from Artistic Outpost
Collage image from Alpha Stamps

 Available in my Etsy Shop

My custom cut glass soldered Coffin pendants. There two sided too!
Collage images by Alpha Stamps
also the darling Halloween charms come from Alpha Stamps

Hope this provides a little Halloween inspiration

Thursday, July 26, 2012

Altered Altoid Tin- The Gipsy

I had so much fun creating the Altered Altoids Tin for a swap I'm in.
What will the Gipsy Fortune Teller reveal?
She can use her tea leaves, the crystal ball,
Palm Reading or perhaps a spin on the Wheel of Fortune!
You decide!

collage images by Alpha Stamps
I'm entering this in the Simon Says challenge this week
where anything goes!

Tuesday, July 24, 2012

The Oregon Coast


We're back from our trip to the Oregon coast.
Stopped along the way to take in the waterfalls.

Vic & I.
At a fish hatchery.

Gorgeous Falls!

Found shipwreck's on the beach.

 Four Stevens and look they even named it after us! LOL

Enjoying the local cuisine.

Our view from our tent one day.

We had our Anniversary dinner at Tidal Raves. It was wonderful!

This is right outside the restaurant, we had a gorgeous ocean view.

spent some time at the Aquarium

This little guy was darling!

In Newport we took this boat out crabbing.

We each limited out on  crab.

This was a working boat where we all had a job to do. Vic helped pull pots.
I had to check the size and sexes for keepers.(no that's NOT me) LOL
I did get pinched a couple of times really good and
unfortunately did get a little sea sick when we hit the ocean.

The beautiful coast

teeheehee

We walked along the beach and will cherish all these memories for a lifetime.

Monday, July 16, 2012

Taking a break

Hubby and I are heading out for a week on the coast. I'll be back with hopefully some beautiful photos and great memories.

Thursday, July 12, 2012

Go Big & Go Bold- Murals


Isn't this just a fun wall! just one of the pieces
 I've done for some very talented clients of mine.
He can do just about anything with a hammer and saw
and she is oozing with talent.
 Her decorating skills are un-matched by any I've ever seen.
No kidding their home should be in a Better homes and Garden magazine!!!
These photos are from their ranch.
The guest bedroom done with bright red poppies.

and the larger than life Antique styled horse done on the barn door.
It was inspired by a pillow of all things.
I wish you could see their home. It would knock your socks off!
I'll be back to share more soon.


Friday, July 6, 2012

Domino books & Ss magazine winner

Its been such a busy summer already.
Sorry if I haven't had time to visit but I'll be over as soon as I can.
In the meantime....
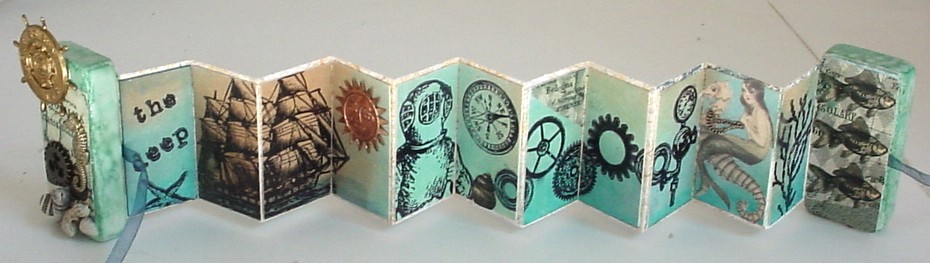
Here's a little Nautical Steampunk Domino book I created
for a swap I'm in. Well actually I created two.
It will be a surprise as to which one she receives!

Stamps are from Oxford Impressions
The Deep and Steampunk works.
collage images, mini shells and sea horse charm are from Alpha Stamps
other fish collage image from Artchix Studios

A Steampunk Domino book with a theme of Machines.
Collage images from Plush Possum Studio 
where you can find tons of FREE digital images
Train is from Graphics 45 papers.

sorry these pictures didn't come out so well.

I still need that new camera! LOL

I used the random # generator to draw the winner of the magazine.
Its # 50

Random Integer Generator

Here are your random numbers:
50
Timestamp: 2012-07-06 17:35:02 UTC
So the winner of the SS magazine is.....Lynn F.
Congrats Lynn. Please send me your snail mail and I'll get your magazine right out.

Thanks for stopping by. Hope your all having a GREAT summer!!

Blog Archive